After I completed my first Silverlight application I decided to put the technology down until Microsoft implemented the full network stack. I felt strongly about this because the primary motivation for me to work with the Silverlight platform was 100% driven by the ability to do desktop like development that would work cross platform. I wasn't looking to avoid html/css/javascript development like some people who are looking to the Silverlight platform.
I see Silverlight as a great opportunity to learn a subset of WPF that can be used on Windows/Mac/Linux. Silverlight also offers me the ability to learn how desktop applications work differently from web applications.
With the beta release of Silverlight 4 the dream was kept alive because Microsoft finally added the ability to use network credentials. I could finally build my out of browser Twitter client without having to rely on some local web service to make the API calls!
To get started you will need to download the beta runtime, the SDK and the toolkit. Before you can install these you must also have Visual Studio 2010 beta 2 ready to go. I will host everything except VS2010 beta 2 here because I hate how you come across old blog posts that reference beta downloads that can no longer be found.
To pass network credentials with Silverlight 4 you must use the WebClient class. This class will manage the low level http GET/POST work for you including async event handling.
Before we actually get into code I should point out a few things I learned about out of browser support in Silverlight 4. The first is that if you want to use network credentials you need to have a trusted application that is only executable out of browser.
First you need to create a new Silverlight 4 project. Next right click the project and bring up the properties window. Now in the properties window you will notice an option for out of browser support.
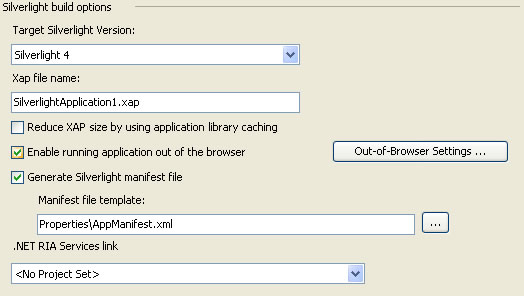
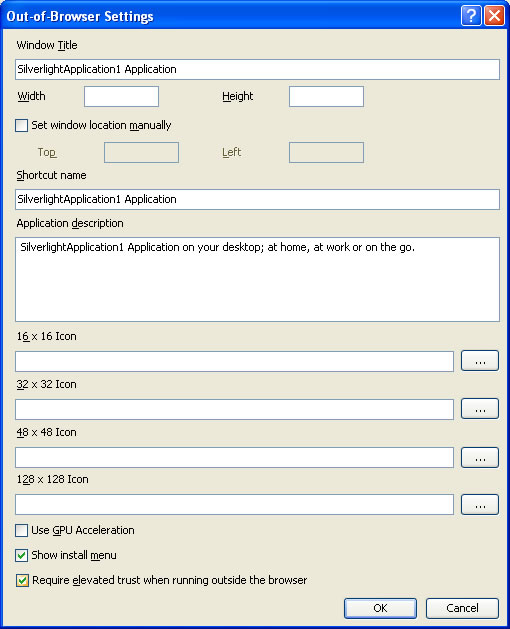
After you check that option you will need to click the out of browser options button. Inside this window you will notice a checkbox toward the very bottom that says 'Require elevated trust when running outside the browser'.
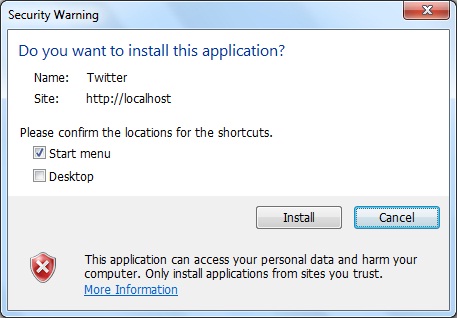
After you check this the user will get a dialog similar to the below that explains to the user 'this application might harm your computer if you are not careful'. This is when you know the application is running in full trust. And full trust is a requirement for network communication with credentials.
Now that we have the project setup to produce an out of browser full trust app we can start writing some code. So the first method we want to write is a simple http GET that will ask the Twitter API for a timeline of status updates.
1
2
3
4
5
6
7
8
9
10
11
        public void RequestTimelineFromTwitterAPI()
        {
            WebRequest.RegisterPrefix('https://', System.Net.Browser.WebRequestCreator.ClientHttp);

            WebClient myService = new WebClient();
            myService.AllowReadStreamBuffering = true;
            myService.UseDefaultCredentials = false;
            myService.Credentials = new NetworkCredential('username', 'password');
            myService.DownloadStringCompleted += new DownloadStringCompletedEventHandler(TimelineRequestCompleted);
            myService.DownloadStringAsync(new Uri('https://twitter.com/statuses/friends_timeline.xml'));
        }
Notice we again must call this async so on the return of this method we will handle the XML parsing work.
1
2
3
4
5
6
7
8
9
10
11
12
13
14
15
16
17
18
19
20
21
22
23
24
25
26
27
28
        public void TimelineRequestCompleted(object sender, System.Net.DownloadStringCompletedEventArgs e)
        {
            if (e.Error != null)
            {
                StatusMessage.Text = 'This application must be installed first';
            }
            else
            {
                List<TwitterStatus> StatusCollection = new List<TwitterStatus>();
                XDocument xdoc = XDocument.Parse(e.Result.ToString());

                StatusCollection = (from status in xdoc.Descendants('status')
                                    select new TwitterStatus
                                    {
                                        Text = status.Element('text').Value,
                                        User = status.Element('user').Element('screen_name').Value
                                    }).ToList();

                this.Dispatcher.BeginInvoke(() => CallDatabindMethod(StatusCollection));
            }
        }

        private object CallDatabindMethod(List<TwitterStatus> StatusCollection)
        {
            Tweeple.ItemsSource = StatusCollection;

            return null;
        }
In the XAML we have a very simple ListBox control that we use to data bind this collection.
1
2
3
4
5
6
7
8
9
10
11
12
13
14
15
16
17
18
19
            <ListBox x:Name='Tweeple' Background='White' Height='500'
                 Width='600' BorderBrush='Black' BorderThickness='1'
                 FontFamily='Arial' Margin='0,0,0,0' VerticalAlignment='Top'>
                <ListBox.ItemTemplate>
                    <DataTemplate>
                        <Grid Width='500'>
                            <Grid.ColumnDefinitions>
                                <ColumnDefinition Width='.30*' />
                                <ColumnDefinition Width='.70*' />
                            </Grid.ColumnDefinitions>
                            <Grid.RowDefinitions>
                                <RowDefinition Height='50' />
                            </Grid.RowDefinitions>
                            <TextBlock Grid.Column='0' Text='{Binding Path=User}' FontSize='15' />
                            <TextBlock Grid.Column='1' Text='{Binding Path=Text}' FontSize='15' TextWrapping='Wrap' />
                        </Grid>
                    </DataTemplate>
                </ListBox.ItemTemplate>
            </ListBox>
Now to actually run this you will need to run the application. The first time you run this you will get an error because the application is not out of browser. So to get it working simply right click and choose to install it. Now that everything is running out of browser you should get a valid list of status updates!
If you download the sample application be sure to enter valid twitter credentials if you want to see it working. The sample does allow you to get your timeline and post an update if you want to see how an http POST is done in Silverlight 4 with network credentials.
